|
|
VR Development Framework
v 1.0.0
|
|
|
VR Development Framework
v 1.0.0
|
You will have to perform a couple of simple steps before getting started with arc-vr:
Edit > Project Settings and under Time > Fixed Timestep set it to 0.01111111.No further steps are required to make your project arc-vr compatible. However, if you are planning on using SteamVR (HTC Vive or Valve Index) you will have to make Unity's XR Plug-in Manager compatible with the SteamVR input system (see next step).
Arc-vr uses Unity's XR Plug-in Manager as a general API. Unfortunately, the XR Manager does not include a default plug-in for the HTC Vive or Valve Index. If you plan on using either of these (or using SteamVR in general), you'll need to perform a couple of extra steps before everything is in place.
You can try using Valve's own OpenVR plugin, but I recommend to use Khronos' OpenXR instead, as it supports a wider range of devices and generally has more features. The following steps will describe how to set up a project intended for the HTC Vive with OpenXR:
Windows > Package Manager. Display all packages from the 'Unity Registry', then find and select 'OpenXR Plugin'. Click 'Install'.Edit > Project Settings, and select XR Plug-in Management. Enable the 'OpenXR' option.Your first step should be to choose which arc-vr packages you require for your project. Look at the overview for a feature-list.
Once you've chosen which packages you need, head over to the github release tab and download the respective .tgz files.
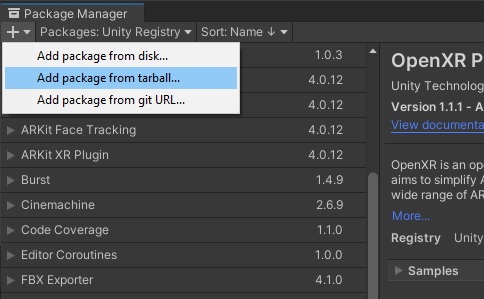
Under Windows > Package Manager click the plus sign and select 'Add package from tarball'. Browse to the downloaded '.tgz' file and select it.
Project Settings > Player > Active Input Handling to "Both", for it to work as intended. There are plans to migrate arc-vr-ui to the new InputSystem in the near future. 
