Arc-vr-core is the core package of the arc-vr framework. It contains all base classes and components that the other packages make use of. These include all rudimentary VR features such as spatial tracking, controller-inputs and other utilities. In many cases, this package might be all you need for your project.
Classes are intentionally built to be inherited, derived and modified. Don't shy away from taking a look into the source code and adapting it to better suit your project.
The documentation you are looking at right now, as well as docs for all other packages are included in arc-vr-core. If you take a look inside Packages/com.avr.core/Documentation/docs you will find all html, css and resource files of the docs.
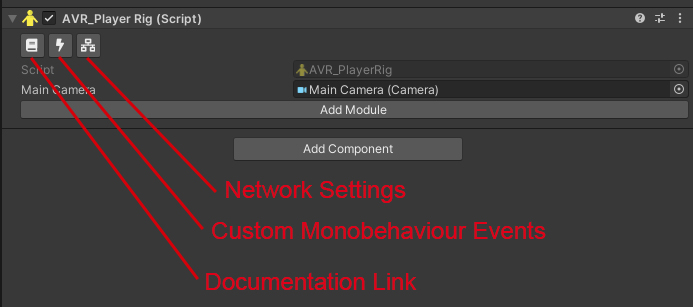
Each arc-vr component will have a button inside the Unity Editor that opens the respective documentation page in the browser (See (Editor Untilities)[EditorUtilities]). If you are creating your own AVR_Component-objects and want them to link to the proper page, take a look at the (DocumentationUrl attribute)[DocumentationUrlAttribute] to see how to set this link yourself.
These files are generated using Doxygen 1.8.7. Under Packages/com.avr.core/Documentation you will find the doxygen executable as well as the respective doxygen configuration file called avr_dxy_config.
Tutorials (such as this one) are located in Documentation/tutorials. In these markdown files you can use all default doxygen commands as well as a few custom commands that are defined in the config file.
You can re-generate the whole projects documentation any time by simply running .\doxygen_1_8_7.exe .\avr_dxy_config inside the Documentation folder. Doxygen will automatically extract code-summaries and produce up-to-date html files.
arc-vr-core includes several C# Attributes for various purposes. For a more detailed description head to the AVR.Core.Attributes documentation.
Here's a quick overview:
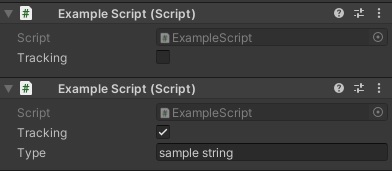
This attribute lets you hide properties in the Unity inspector based on a condition. Here's a basic example:
public bool tracking = false;

[ConditionalHideInInspector("tracking", true)]
public string type;
The property 'type' will not be shown in the inspector unless 'tracking' is set to true.

You can also use this attribute with more sophisticated conditions than just booleans. Check the detailed docs for more.
Makes a propery read-only in the Unity inspector. Example: (target can not be set in the inspector, but still viewed)
[ReadOnly]
public string target="sample_target";

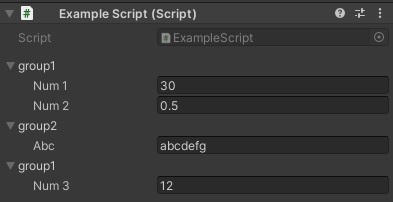
Creates a foldout group of properties in the Unity inspector using a string-based group-id.
Example:
[FoldoutGroup("group1")]
public float num1 = 30f;
[FoldoutGroup("group1")]
public float num2 = 0.5f;

[FoldoutGroup("group2")]
public string abc = "abcdefg";

[FoldoutGroup("group1")]
public float num3 = 12f;

With this attribute you can declare a static, void function to act as a command for the AVR.Core.AVR_DevConsole. The parameters of this function have to be either of type 'string', 'string[]' or none.
[ConsoleCommand("example_command", 2, "Replies with the second argument passed")]
static void example_command(string[] args) {
    print(args[1]);
}
The example above will create a command called 'example_command' with a minimum of 2 arguments that simply outputs the second argument passed.
This attribute defines the html page that is opened when the user clicks on the documentation button of an AVR_Behaviour in the Unity Editor. The html files are located in the Packages/com.avr.core/Documentation/html directory.
Example:
[DocumentationUrl("class_a_v_r_1_1_core_1_1_a_v_r___controller.html")]
public class AVR_Example : AVR_Behaviour
{ ... }
Most arc-vr scripts inherit from AVR_Behaviour. An AVR_Behaviour is, in essence, a regular MonoBehaviour but with a DocumentationUrl button and some quick-access members such as AVR_Behaviour.playerRig and AVR_Behaviour.root.
Components such as feature-providers, tracked devices or modules are represented by an AVR_Component. An AVR_Component is an adds further complexity to AVR_Behaviour. If the arc-vr-net package is present, MLAPI-related information can be accessed through AVR_Component.networkAPI.

An AVR_Component that includes convenient, quick access to an AVR_Controller that is attatched to a parent gameobject.
For instance, you can easily execute an action if the trigger-button on a controller is pressed like so:
if(controller.inputManager.triggerButton) {
    // do something...
}
Represents a tracked object, such as a HMD or controller. The track object is identified through the UnityEngine.XR.XRNode enum.
Tracking can be enabled/disabled at will and smoothed to avoid jitter.
Typical handheld VR controllers, such as the HTC Vive or Vive Index controllers are represented by the AVR_Controller class.
The class gives access to input data (if an inputManager is attatched) as well as haptic capabilites.
The overall configuration of HMD and controllers (ie the "player") is represented by an AVR_PlayerRig.
The playerRig acts as a singleton, meaning, only one can be active in a scene at any given time.
The class provides a plethora of useful data and functions, all easily accessible through the AVR_Behaviour.playerRig member. For a full list, see AVR.Core.AVR_PlayerRig.
arc-vr-core comes with a built-in developers console. It provides a useful interface for printing logs, running functions and debugging code.
The console is accessible both in the editor as well as in the built project.
You can access the console in the following ways:
AVR > Open DevConsole to bring up an in-editor console.AVR > Create Root Object to create a default root object with an attached default console. Alternatively, attach an AVR_BasicDevConsoleUI script to a gameobject. Once the game is running you can press the console button (Tab by default, but you can change this in the settings under setting > core > devConsole) to bring up a simple devconsole ingame.AVR_BasicDevConsoleUI is not to your liking, you can make easily create your own mirror. You can use the included 'AVR_DevConsoleMirror' script or use the Console API. For instance, AVR_DevConsole.get_text() will give you a string of the output, AVR_DevConsole.command(s) will execute a command and AVR_DevConsole.history(t) will give you commands executed in the past.The most basic way of printing to the console is to call AVR_DevConsole.print("..."). You can use the print, success, error, warn, raw_print methods to log errors, warnings or success-messages respectively.
It is often useful to print contextual information on the caller of the logging function. You can pass an additional parameter when using the cprint, csuccess, cerror, cwarn functions, as in AVR_DevConsole.cerror("I did a booboo", this) or AVR_DevConsole.cerror("He did a booboo", SomeOtherObject).
Each arc-vr package comes with an additional set of commands you can run. You can use the commands command to print a list of all available commands there are. You can also use the help [command] command to print information on any given command.
Creating a new command is simple and can be done in one of the following ways:
AVR_DevConsole.register_commandAVR_DevConsole.register_command("say_hello", (s) => AVR_DevConsole.print("Hello"), 0, "Prints a hello message to the console");
The code above will create a new command say_hello that takes no parameters and prints a message when executed.
ConsoleCommand AttributeWith this attribute you can declare a static, void function to act as a command. The attribute is located in the AVR.Core.Attributes namespace. The parameters of this function have to be either of type 'string', 'string[]' or none.
[ConsoleCommand("example_command", 2, "Replies with the second argument passed")]
static void example_command(string[] args) {
    print(args[1]);
}
The example above will create a command called 'example_command' with a minimum of 2 arguments that simply outputs the second argument passed.
The program scans all files with the .avr suffix for settings. Each package comes with its own .avr-settings file. The content of these files follows as JSON-similar syntax. Here's a simple example:
settings = {
    category = {
        option1 = true
        subcategory = {
            option2 = "SomeString"
            option3 = 19.0f
        }
}
You can access these values anywhere in you code by calling, for example, AVR_Settings.get_float("/settings/category/subcategory/option3").
You can also edit settings anytime in the Editor by going to AVR > Settings. Any changes made here will be written into the ~overridesettings.avr file, which will always be scanned last (and thus will overwrite any previous entries).
You can automatically build the packages into tarball files by running AVR > Build Tarballs. The built files will be placed into a /tarballs directory next to the project directory.